If you are a climber, chances are you’ve thought about building a home wall at some point during this pandemic. In the past months, social media has been flooded with images of home walls of wildly varying quality in living rooms, backyards and basements. Some of these walls seem as though they were hastily put together without much thought or consideration, while some of them have been professionally installed. I have a friend who is normally a gym route-setter, but recently, he has been taking advantage of the home gym craze and some unanticipated free time to capitalize on his carpentry skills and build custom walls. In fact, he has been so successful that he started his own company - if you need a wall built, check him out here.
If you’re a motivated climber like myself, you likely had some climbing goals for the Spring/Summer season, and now that climbing gyms are headed into uncharted waters, you want to guarantee that your training will pay off, or that you even have the means to train at all. This is exactly how I felt several weeks ago and as far as I could see, there was only one way to guarantee the results I desired – build my own home training wall!
But where do I start? So many questions… How much will it cost? Do I have all the right tools? Where am I going to put it? Can I go to the hardware store during a stay at home order? What’s that smell? How long has it been since I showered? What day is it? And so much more…
This was my process:
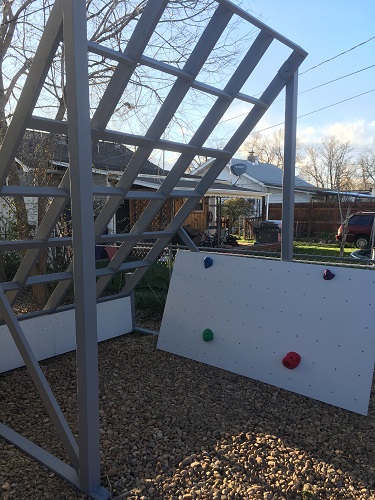
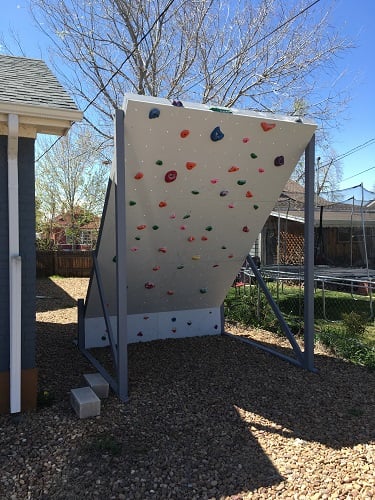
Step 1: Planning. I am an obsessive over-planner, so I spent a lot of time on this step, making sure that I have every measurement and calculation correct before I move on to the next step. The first part of planning was choosing a location for this thing to live. My house does not have any available basement or garage space, so I decided to build an outdoor wall in my backyard. This decision made me have to consider some things that indoor wall builders will not have to think about – weatherproofing and local wildlife. In other words, paint the crap out of it and don’t create spaces for squirrels/raccoons/wasps to make homes in. Next, I had to decide how big this wall was going to be. I decided to utilize 3 full sheets of plywood for a 45 degree climbing surface that is 8 feet wide by 12 feet long with an 18 inch vertical kickboard (place to start your feet) at the bottom. Because it is going outside, I wanted to make the frame and support structure quite burly, so I used 2x6’s for most of the frame and 4x4s for the main support. Another big consideration is tools – do you have the tools necessary to complete this project? Some essential tools I used were a mitre saw, impact driver, tape measure (duh), drill, jigsaw, ladder, and a chalk line. Once I figured out tools and how much lumber I would need, it was time to go shopping.
Step 2: Shopping. Don’t forget to wear a mask. Every time I start a project like this, I seem to think that I can make it happen with one trip to the hardware store. Ha! Anyone who has taken on a project like this knows that you will at least make 2 trips to the hardware store for every $100 you spend. I had calculated this wall to cost around $700, so that means I would be making roughly 14 trips to the hardware store. I actually made 7 trips altogether, so, not too bad. Don’t forget to think about screws. I used a lot of screws and had to go back to the store just to get more screws. Tip: I would recommend screws that use a torx (or star) bit – they won’t strip and they work well with an impact driver.
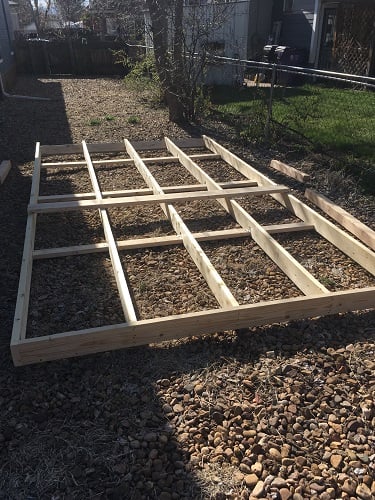
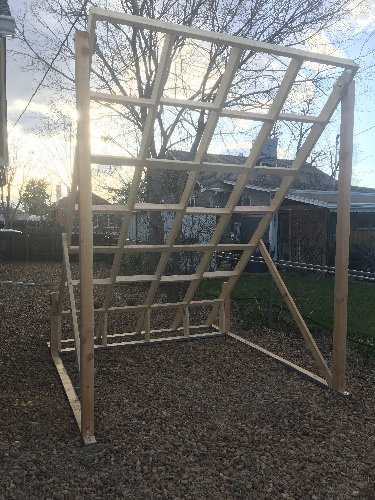
Step 3: Frame Construction. First, I took all of the wood and made all of the cuts that I would need with a mitre saw. Then, I constructed the main frame of the wall on the ground with the intention of raising it into place at a 45 degree angle. Make sure your frame has enough cross supports to safely support the weight of the plywood and a climber. Mine is basically composed of 2’x2’ squares that have cross supports around them – in other words, the biggest unsupported section of plywood on the wall is 2’x2’. Once the frame was constructed, I loosely attached the main 4x4 vertical supports to the frame with some big ½ inch bolts. As we raised the frame up, the supports would rise into place. Once the wall was up on the main supports, I added all of the additional permanent supports – for each side, there is a 2x4 on the ground extending from the base of the wall to the main support and a diagonal 2x4 from the base of the main support to the middle of the outside of the frame. Once the wall was fully supported, I added the small framing for the kickboard, making the frame complete.
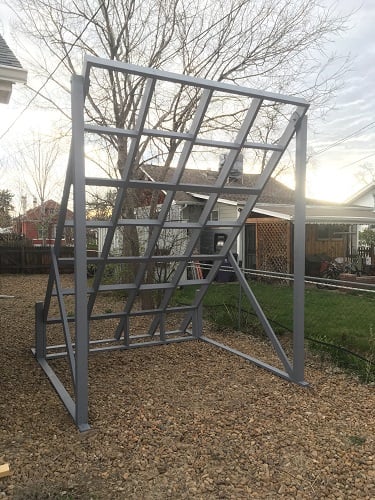
Step 4: Paint the frame. I used 2 gallons of durable exterior paint on the frame so that it will last. I will probably have to re-paint in the next couple years to keep the wall weather-resistant.
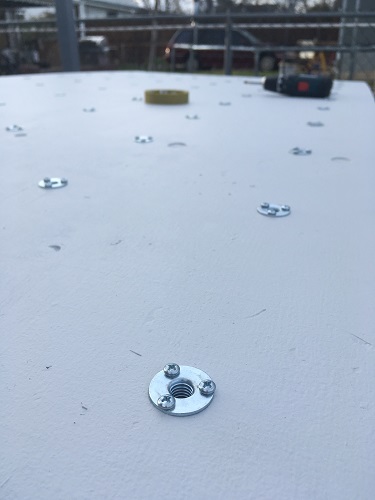
Step 5: Plywood prep. This is where t-nuts come into consideration. There are several different types out there – traditional hammer-in pronged t-nuts (~.10/ea), round base with 3 brad screw t-nuts (~.25/ea), and industrial 3 brad screw t-nuts (~.35/ea). If you want stainless steel, multiply the price times 5. Since I did not want to pony up for stainless, I went with the middle road and got the $0.25 3 brad hole t-nuts. I decided to place t-nuts 8 inches apart because that way, I would have plenty of hold placement options and the t-nuts would not fall in the same spot as any of my frame supports. Use a chalk line to mark where your holes will be. I also drilled through all 3 sheets at once to save time (this will also prevent 2 of your sheets from ‘blowing out’ the holes on the backside).
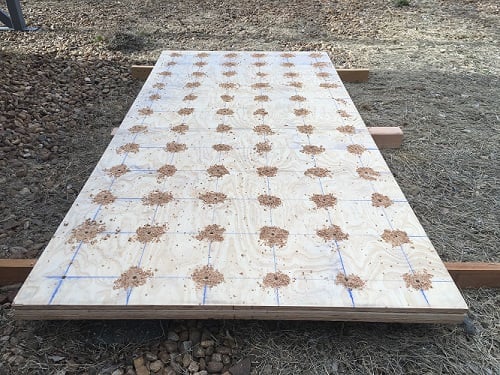
After the holes were drilled, I applied 2 coats of durable outdoor paint to each sheet. Next, install 240 t-nuts, which if you use the 3-screw t-nuts, is 720 little screws that you have to screw in… fun! This step took a lot longer than I had anticipated and those 720 5/8” screws absolutely destroyed my finger tips. Tip – wear gloves.
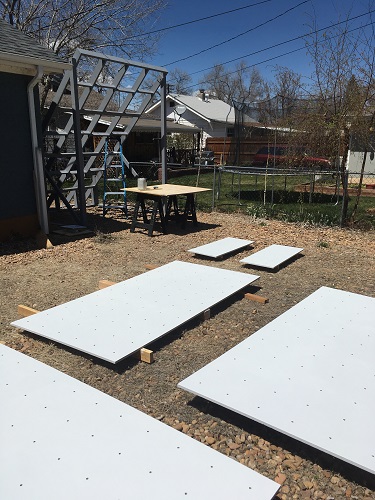
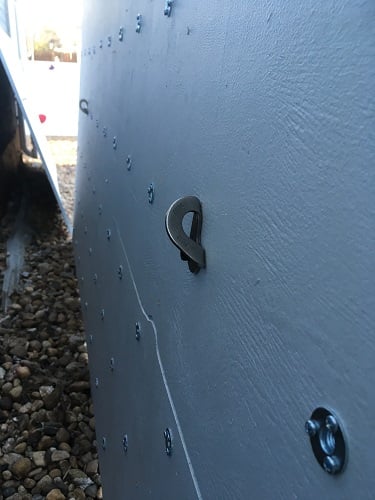
Step 6: Put the Plywood on the frame. This part was easier that I had anticipated because of the solution I used. First, put the kickboard panels on. For the first full sheet, I put some jugs on some of the t-nuts so that we had something to hold onto to lift it into place. I also screwed a couple 2x4’s to the kickboard for the first full panel to ‘rest on’ while I screwed the panel to the frame. The upper 2 sheets required a little bit of climbing problem solving. For these two sheets, I intentionally left off 2 of the t-nuts and inserted them the opposite way (without screwing in the brad screws) and put a bolt hanger on them. Then, I attached a couple 2x4 pieces to the back of the frame above where the bolt hangers would end up on the wall. I attached a short sling with a micro traxion (progress capture pulley) to each 2x4, put a rope through the pulley, and attached to rope to the bolt hangers on the plywood sheet. Because it is a progress capture pulley, as you lift, it will not fall back down and it will hold the plywood in place so that you can attach it with screws.
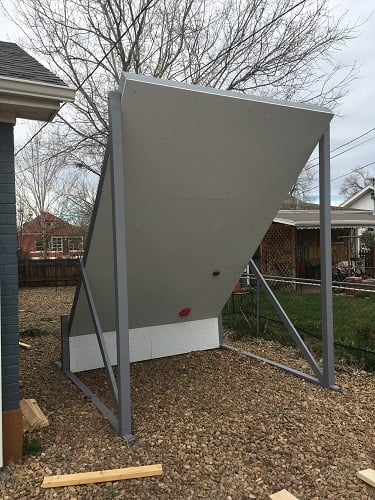
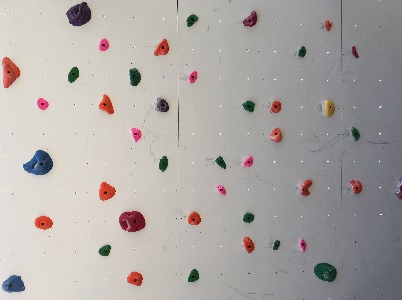
Step 7: Put some holds on it! Holds are expensive. Metolius makes some Mega Packs of 40, 50, or 60 holds that are a great way to start out and get your wall going, however, there are a lot of hold companies out there making cool shapes, so make sure you explore some of those other brands. Tension Climbing makes wooden holds if you are not a fan of the traditional texture of plastic holds. The goal of a training wall should be to fill every t-nut to maximize your ability to change up your climbing routine.
Step 8: Climb! And get swoll… duh.
Now, go forth and build a wall!